FAQ
My account
Profile
Create account
Log out
Home
Machines
Cutting Plotters
Heat Press - Transfer Press
Laminating Machines
Cutting Machines
CNC Machines
Laser Cutting and Engraving Machines
Large Format Printers
Direct-To-Film Printers
Solvent Printers
UV Printers
Resin/Latex Printers
Label Printers
Sublimation Printers
Sewing and Embroidery Machines
3D Printers
3D Scanners
Creative Products
Redsail Cutting Plotter 70 cm
Read more
Expert II 24 LX - 70cm
Read more
Materials
Standard Foil
Overview
Application tape
Oracal 631
Oracal 651
Oracal 751
Oracal 951
Oracal 961
Oracal 970 Matt
Oracal 970ra
Oracal 975
Oracal 451
Oracal 638
Special Foil
Overview
Oracal Metallised Films
Oralite 5500
Oralite 5600E
Oralite 5700
Oracal 6510
Oracal 7510
Oracal 8300
Oracal 8500
Oracal 8870
Oralux 9300
Oramask
Lamination Foil
Glass Decoration Foil
Magnetic Foil
Antigraffiti Foil
Blackboard Foil
Special Foil
Digital media for print
Solvent print media
Large format print media
Textile Foil
Overview
STAHLS' HTV
Chemica Firstmark
Chemica Hotmark
Chemica Hotmark Revolution
Chemica Quickflex
Chemica Flock
Chemica Galaxy
Chemica Sunmark
Chemica Printable
Chemica Reflex
Chemica Darklite
Chemica Metallic
Chemica Fashion
Chemica Bling-Bling
Chemica Allmark
Chemica Carbon
Chemica Trends
Blocker
Transfer Paper
Heat Transfer Vinyl
Window Film for Cars
Marathon Window Film
CFC Window Film
Window Film for Buildings
Daylight window film
Solar Silver Window Film
Sunlight Window Film
Palisade Solar Film
Color Chart
Sublimation media
Filament for 3D Printing
PLA
PETG
ABS
TPU
Special filament
Materials for Label Printer
Materials for laser
Plywood
MDF
Acrylic
Engravable keychain
Materials for embroidery and sewing
Embroidery
Sewing
Chemica Hotmark Black 403 foil
Read more
Black 651-070 5-Year Self-Adhesive Sign Vinyl
Read more
Oracal 631-010 3 year foil White Vinyl
Read more
Quickflex Revolution 3602 Gold
Read more
Accessories
Plotter Blades
Roland
Graphtec
P-Cut
Mimaki
Mutoh
Ioline
Summagraphic
ANA-GRAPH
Foison
Redsail
GCC - Puma/Jaguar/Expert
Brother
Software
Cutting Software
Spare parts
Cutting Plotter
Heat Press
Cutting Lists
Rulers and Cutting tools
Knives
Knife blades
Scissors
Rulers
Ruler accessories
Weeders and Tweezers
Cutting mats
Sign Tools
Rollers
Miscellaneous
Mounting tools
Scraper
Handles
Fastener
Bags and Cases
Equipment for bags
Tool Bag
Wrist Bag
Toolbox
Cleaning
Cloths
Cleaning and Kits
Glass scrapers
Wrapping tools
Equipment
Tape
Roll holder
Information cards
Roll Stand
Material rolls
Roland Accessories
Accessories for Print
Sublimation
Solvent
UV
Direct-to-film
Inkjet
Accessories Heat Presses
Teflon pads
Teflon sheets and tape
Silicone mats
Hot press equipment
Miscellaneous
Accessories Cutting Plotters
Accessories Brother Cutting Plotter
Various Cutting Plotter Equipment
Miscellaneous
Accessories for Laser Machines
3D Print Accessories
Various
3D Building Boards
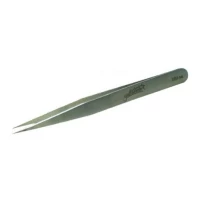
Opposition tweezers (SignTweezer)
Read more
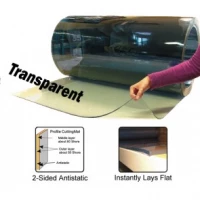
Cutting mat Chrystal 1,0 m
Read more
Textile Start Kit
Read more
Textiles
Stormtech
T-shirts
Polos
Sweatshirts
Shirts
Jackets
Caps
Bags
Tote bags
Miscellaneous
Sports
Bodywarmer
Fleece
Brands
Stormtech
Outerwear - Technical
Outerwear - Thermo
System Jackets
Workwear
Performance - Fleece
Lightweight
Performance - Polos
Performance - Athletics
Corporate
Bags
Brands
James & Nicholson
B&C Collection
Sols
Stormtech
Myrtle Beach
Package deals
Get Started
Service Packages
DIY - Do-It-Yourself
Offer
Checkout
0
Machines
Cutting Plotters
Heat Press - Transfer Press
Laminating Machines
Cutting Machines
CNC Machines
Laser Cutting and Engraving Machines
CO2 Lasers
Diode Lasers
Fiber Laser
UV Lasers
Large Format Printers
Direct-To-Film Printers
Solvent Printers
UV Printers
Resin/Latex Printers
Label Printers
Sublimation Printers
Sewing and Embroidery Machines
3D Printers
3D Scanners
Creative Products
Materials
Standard Foil
Overview
Application tape
Oracal 631
Oracal 651
Oracal 751
Oracal 951
Oracal 961
Oracal 970 Matt
Oracal 970ra
Oracal 975
Oracal 451
Oracal 638
Special Foil
Overview
Oracal Metallised Films
Oralite 5500
Oralite 5600E
Oralite 5700
Oracal 6510
Oracal 7510
Oracal 8300
Oracal 8500
Oracal 8870
Oralux 9300
Oramask
Oramask 810
Oramask 831
Lamination Foil
Glass Decoration Foil
Magnetic Foil
Antigraffiti Foil
Blackboard Foil
Special Foil
Digital media for print
Solvent print media
Large format print media
Textile Foil
Overview
STAHLS' HTV
STAHLS' SportsFilm
STAHLS' Premium Plus
STAHLS' Basic Film
STAHLS' Glitter Flake
STAHLS' Fancy
STAHLS' Flock
STAHLS' Soft Metalic
STAHLS' Hologram
STAHLS' Puff
STAHLS' Reflective
STAHLS' Glow
STAHLS' Disco
STAHLS' Glimmer
STAHLS' Chroma TWILL
STAHLS' UV Shift
Chemica Firstmark
Chemica Hotmark
Chemica Hotmark Revolution
Chemica Quickflex
Chemica Flock
Chemica Galaxy
Chemica Sunmark
Chemica Printable
Chemica Reflex
Chemica Darklite
Chemica Metallic
Chemica Fashion
Chemica Bling-Bling
Chemica Allmark
Chemica Carbon
Chemica Trends
Blocker
Transfer Paper
Heat Transfer Vinyl
Window Film for Cars
Marathon Window Film
CFC Window Film
Window Film for Buildings
Daylight window film
Solar Silver Window Film
Sunlight Window Film
Palisade Solar Film
Color Chart
Sublimation media
Filament for 3D Printing
PLA
Skilpro Filament
PLA++
PLA++ Matte
PLA++ Silk
PLA++ Transparent
PLA++ Glitter
PLA++ Chameleon
PLA++ Flexible
PLA++ Change by UV / Temp
3DE Filament
Bambu Lab Filament
eSUN Filament
PETG
ABS
TPU
Special filament
Materials for Label Printer
Materials for laser
Plywood
MDF
Acrylic
Engravable keychain
Materials for embroidery and sewing
Embroidery
Sewing
Accessories
Plotter Blades
Roland
Graphtec
P-Cut
Mimaki
Mutoh
Ioline
Summagraphic
ANA-GRAPH
Foison
Redsail
GCC - Puma/Jaguar/Expert
Brother
Software
Cutting Software
Spare parts
Cutting Plotter
Heat Press
Cutting Lists
Rulers and Cutting tools
Knives
Knife blades
Scissors
Rulers
Ruler accessories
Weeders and Tweezers
Cutting mats
Sign Tools
Rollers
Miscellaneous
Mounting tools
Scraper
Handles
Fastener
Bags and Cases
Equipment for bags
Tool Bag
Wrist Bag
Toolbox
Cleaning
Cloths
Cleaning and Kits
Glass scrapers
Wrapping tools
Equipment
Tape
Roll holder
Information cards
Roll Stand
Material rolls
Roland Accessories
Accessories for Print
Sublimation
Ink
Paper etc.
Solvent
Ink
UV
Ink
Direct-to-film
Direct-to-film Ink
Direct-to-film Film & Glue
Inkjet
Canon Ink
Canon paper etc.
Accessories Heat Presses
Teflon pads
Teflon sheets and tape
Silicone mats
Hot press equipment
Miscellaneous
Accessories Cutting Plotters
Accessories Brother Cutting Plotter
Various Cutting Plotter Equipment
Miscellaneous
Accessories for Laser Machines
3D Print Accessories
Various
3D Building Boards
Textiles
Stormtech
Outerwear - Technical
Outerwear - Thermo
System Jackets
Workwear
Performance - Fleece
Lightweight
Performance - Polos
Performance - Athletics
Corporate
Bags
T-shirts
Polos
Sweatshirts
Shirts
Jackets
Caps
Bags
Tote bags
Miscellaneous
Sports
Bodywarmer
Fleece
Brands
James & Nicholson
B&C Collection
Sols
Stormtech
Mens
Womens
Children/Youth
Myrtle Beach
Package deals
Makerspace
Get started
Service packages
Roland Printer Service
DIY - Do-It-Yourself
Offer
Login
You are here:
Home
›
FAQ
›
Signcut
FAQ
Frequently Asked Questions
Teamviewer
Easycut
Winpcsign
Installation
Cutting Plotter
Heat Press
Textile FAQ
12 great tips
Manuals
Signcut
Useful links
Signcut
Installing a Serial USB adapter on Mac OS X 10.4 (Tiger) or later
Setting up SignCut X2
Installing a Serial USB adapter on Mac OS X 10.4 (Tiger) or later
Connect the Serial USB adapter to an available USB port on your Mac
Insert the included driver CD into the CD ROM drive
Open the CD from the desktop
Go to the "driver/MAC/” folder
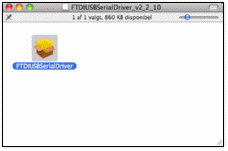
Double click "OS X 10.4 (Tiger ) or later.dmg”
Double click the "FTDIUSBSerialDriver” installation package
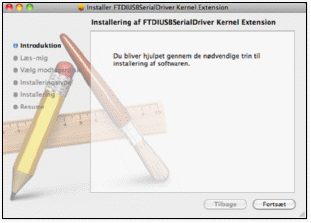
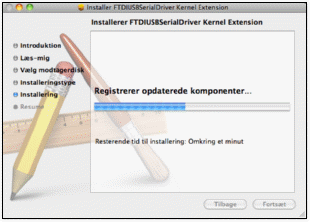
The driver installation will begin
Click "Continue”
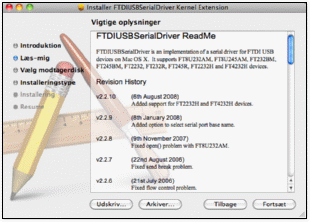
Click "Continue”
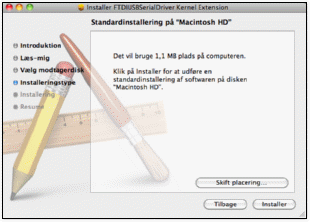
Click "Install”
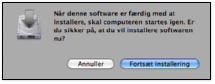
Click "Continue Installation”
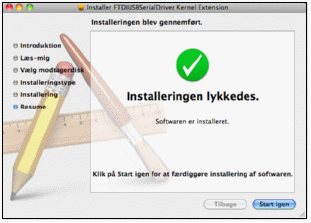
The installation will be completed
The installation is now complete. Click "Restart” to restart your Mac. After restarting, the Serial USB adapter installation is complete
Setting up SignCut X2
Begin by installing SignCut X2 on your Mac
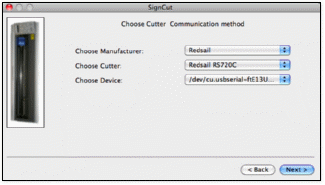
When SignCut X2 is opened for the first time, it must be configured with the correct cutting plotter
In the "Choose Manufacturer:” field, select the manufacturer of your cutting plotter, for example "Redsail”
In the "Choose Cutter:” field, select your cutting plotter model, for example "Redsail RS720C”
In the "Choose Device:” field, select your Serial USB adapter, for example "cu.usbserial xxxxxx”
Click "Next >”
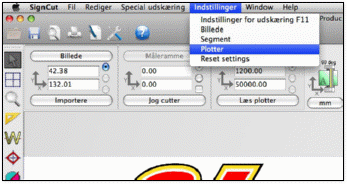
Select "Settings => Cutter” from the menu bar
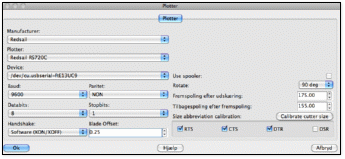
Apply the following settings in this window:
In the "Handshake:” field, select "Software (XON/XOFF)”
In the "Blade Offset:” field, select "0.25”
Under "Size abbreviation calibration:”, select "DTR”
Click "OK”
Contact Us
FAQ
About Us